If you’ve stood in line at Franklin Barbecue in Austin, you know what great smoked brisket tastes like. This recipe follows the Aaron Franklin method — simple salt and pepper, low and slow technique, and a focus on temperature — with a few Flaming Rooster tweaks we’ve found reliable for home cooks.
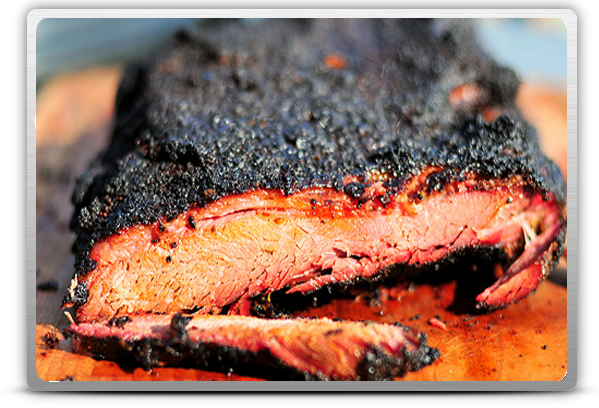
Low and slow plus the right rub produces a tender, juicy beef brisket with a dark, flavorful bark. You won’t need heavy BBQ sauce — offer it on the side as an option — because the meat’s flavor should stand on its own.
Brisket Rub (see recipe: 1/2 kosher salt + 1/2 freshly ground pepper — or use our full Flaming Rooster rub)
Brisket (8 – 15 Pounds) — whole packer or trimmed; leave ~1/4″ fat cap
Oak Wood (post oak is traditional Texas choice; mesquite or hickory are alternatives)
TYPE and SIZE OF BRISKET and APPLYING THE RUB
1
Choose the right brisket for your event — most home cooks pick an 8–15 pound whole packer. As a planning rule, allow roughly 3/4 pound per person for a plated meal or 1/2 pound per person for a day‑long grazing/party. You can buy a trimmed brisket or a whole packer; if you get a whole packer, trim it but leave about a 1/4″ fat cap to protect the meat during the long cook and add flavor.
Grade guidance: Choice, Upper Select (the grade Aaron Franklin often prefers), and Prime can all produce excellent results when smoked correctly — technique and temperature matter far more than grade for most home cooks. Focus on even thickness and a good fat cap rather than obsessing over grade.
2
Apply the rub using the Franklin Barbecue approach when you want a classic Texas smoked brisket: 1/2 kosher salt + 1/2 freshly ground black pepper by volume. Alternatively, use the full Flaming Rooster rub (link in the recipe) for a slightly different flavor profile. Lightly but evenly coat the brisket — don’t clump the rub — then wrap in plastic and refrigerate for 8–12 hours to let the salt and pepper begin to season the meat (a short 1‑hour rest helps if you’re pushed for time).
3
About 30–60 minutes before cooking, remove the brisket from the fridge to take the chill off. Heat your ceramic cooker or smoker to a steady 275°F — this temperature gives a dependable balance of bark development and connective‑tissue breakdown. As a rule of thumb at 275°F, estimate roughly 45 minutes per pound; for example, a 12‑pound packer will often run about 9 hours, but thickness and fat content affect finish time, so use internal temperature as your guide throughout the long cook.
Quick trimming checklist (before applying rub):
- Remove large hard chunks of fat and silver skin, but keep a thin, even fat cap (~1/4″).
- Identify flat vs point so you can slice properly after the cook.
- If you buy a packer, trimming brisket at home gives you control over fat side orientation and bark development.
SMOKING TEMPERATURE, WOOD SELECTION and SMOKER PREP
4
Prep your smoker and choose wood with purpose. For a classic Texas flavor we recommend oak — specifically post oak when available — but oak, hickory, or a light mesquite blend all work well depending on how pronounced you want the smoke. For consistent results, stabilize the smoker at a steady 275°F before putting the brisket on: this temperature offers a reliable balance of bark development and connective-tissue breakdown during a long cook.
Smoker prep checklist:
- Clean grates and remove excess ash so airflow is steady.
- Preheat and stabilize at 275°F.
- Use seasoned oak (or post oak) chunks; add small amounts of hickory or mesquite if you want more smoke flavor.
- Use a dual‑probe thermometer (one probe for grill/ambient temp, one for the meat) and place the meat probe into the thickest part of the flat, avoiding large pockets of fat or the seam between point and flat.
Insert your probe so the tip sits in the center of the thickest muscle — not in fat — and run the grill probe near the food to monitor smoker temperature. Accurate probes and stable smoker temp are critical to producing great smoked brisket every time.
5
Smoke until the brisket’s internal temperature hits about 185°F. Expect to hit the “stall” — typically around 160–180°F — where the internal temp plateaus due to evaporative cooling. The stall is normal; patience and steady smoker temperature are your friends. Once the brisket reaches roughly 185°F, the rendered collagen starts to soften and the fat begins to melt.
When you see 185°F in the thickest part, remove the brisket and wrap it tightly in butcher paper (not parchment). Butcher paper breathes slightly and helps preserve bark while allowing the cook to continue; foil will speed the cook but soften the bark — choose based on whether you prioritize bark or speed to finish.
6
After wrapping, continue cooking until the internal temperature reaches roughly 204°F. Why finish to 204°F? At ~185°F the brisket is cooked, but lingering connective tissue and intramuscular fat continue to render; the extra degrees up to about 200–205°F help fully break down collagen and melt fat, producing a moist, tender result. At this stage, smoke contribution is less important than internal temperature and consistent heat — don’t chase smoke for effect.
Quick troubleshooting and tips for the stall and bark:
- If the stall lasts many hours, maintain steady 275°F and resist cranking heat — rushing can dry the meat.
- If bark is developing slowly, check for excessive foil or trapped moisture; butcher paper helps preserve bark while finishing the cook.
- Keep a small pan of water in the smoker only if you need to stabilize temps — it’s optional and not required for all smoker types.
Use internal temperature as your primary guide — finish by feel and probe testing as needed. These steps will help you produce a consistent smoked brisket with great bark and tender point and flat sections ready for slicing.
THE RESTING PROCESS
7
Rest is where a long cook becomes a great one. After 8+ hours on the smoker the internal temperature and juices in the beef brisket need time to settle; holding lets the rendered fat and melted collagen redistribute so each slice stays moist and packed with flavor. Skipping or short‑changing the rest is the most common reason brisket seems dry.
If you’re serving immediately: set the wrapped brisket on a baking pan and leave it uncovered at room temperature for about 30 minutes — this lets surface steam dissipate so the bark stays crisp while the inside relaxes. If you need to hold the brisket longer (an hour or more), keep it wrapped in the butcher paper and place it in a cooler or insulated carrier; it will stay hot for several hours without losing much quality. When ready to serve, unwrap and rest uncovered for another 15 minutes before slicing.
Food safety note: if you plan to hold the brisket for many hours, monitor internal temperature and follow safe‑holding practices so the meat stays above safe temperatures. Using an insulated cooler with towels around the wrapped brisket is a common method to keep it warm for service.
How to slice brisket (quick guide):
- Use a long, sharp slicing knife — a dedicated brisket or carving knife works best; keep it steady and slice with a smooth motion.
- Identify the grain: the flat and the point have different grain directions. Slice the flat across the grain into even, roughly 1/4″ thick slices for serving.
- For the point, consider trimming into chunks and slicing across the grain for juicy pieces, or cube into burnt ends if you prefer intensely caramelized bits.
- If the brisket feels slightly firm at 204°F, let it rest longer — probe tenderness and texture matter more than hitting an exact number.
Serving and finishing tips:
- Serve slices with juices pooled on the cutting board or lightly drizzle a few juices over the sliced meat — avoid drowning the brisket in bbq sauce; offer a small dish of bbq sauce or bbq sauce variations on the side for guests who want it.
- If a brisket seems slightly dry, briefly reheat slices wrapped in foil with a splash of beef broth or pan juices until warmed through — this can revive texture without overcooking.
- Keep trimmed fat and trimmings: they can be rendered for beef tallow or used to baste other cuts.
Final note — we want to know how it turns out: slice your brisket as described, serve hot, and please let us know in the comments or on social how your smoked brisket performed. Share a photo and any tweaks you tried — it helps other home cooks improve their next long cook.